Adding a natural-looking tan in Photoshop is not just about making the skin darker. If you only adjust brightness, the result quickly looks unrealistic: colors become muddy, highlights break, and the image loses depth.
In this guide, you’ll learn how to create a realistic tan with full control over color, light, and skin structure. You’ll also see how to speed up and stabilize the process using Retouch4me tools.
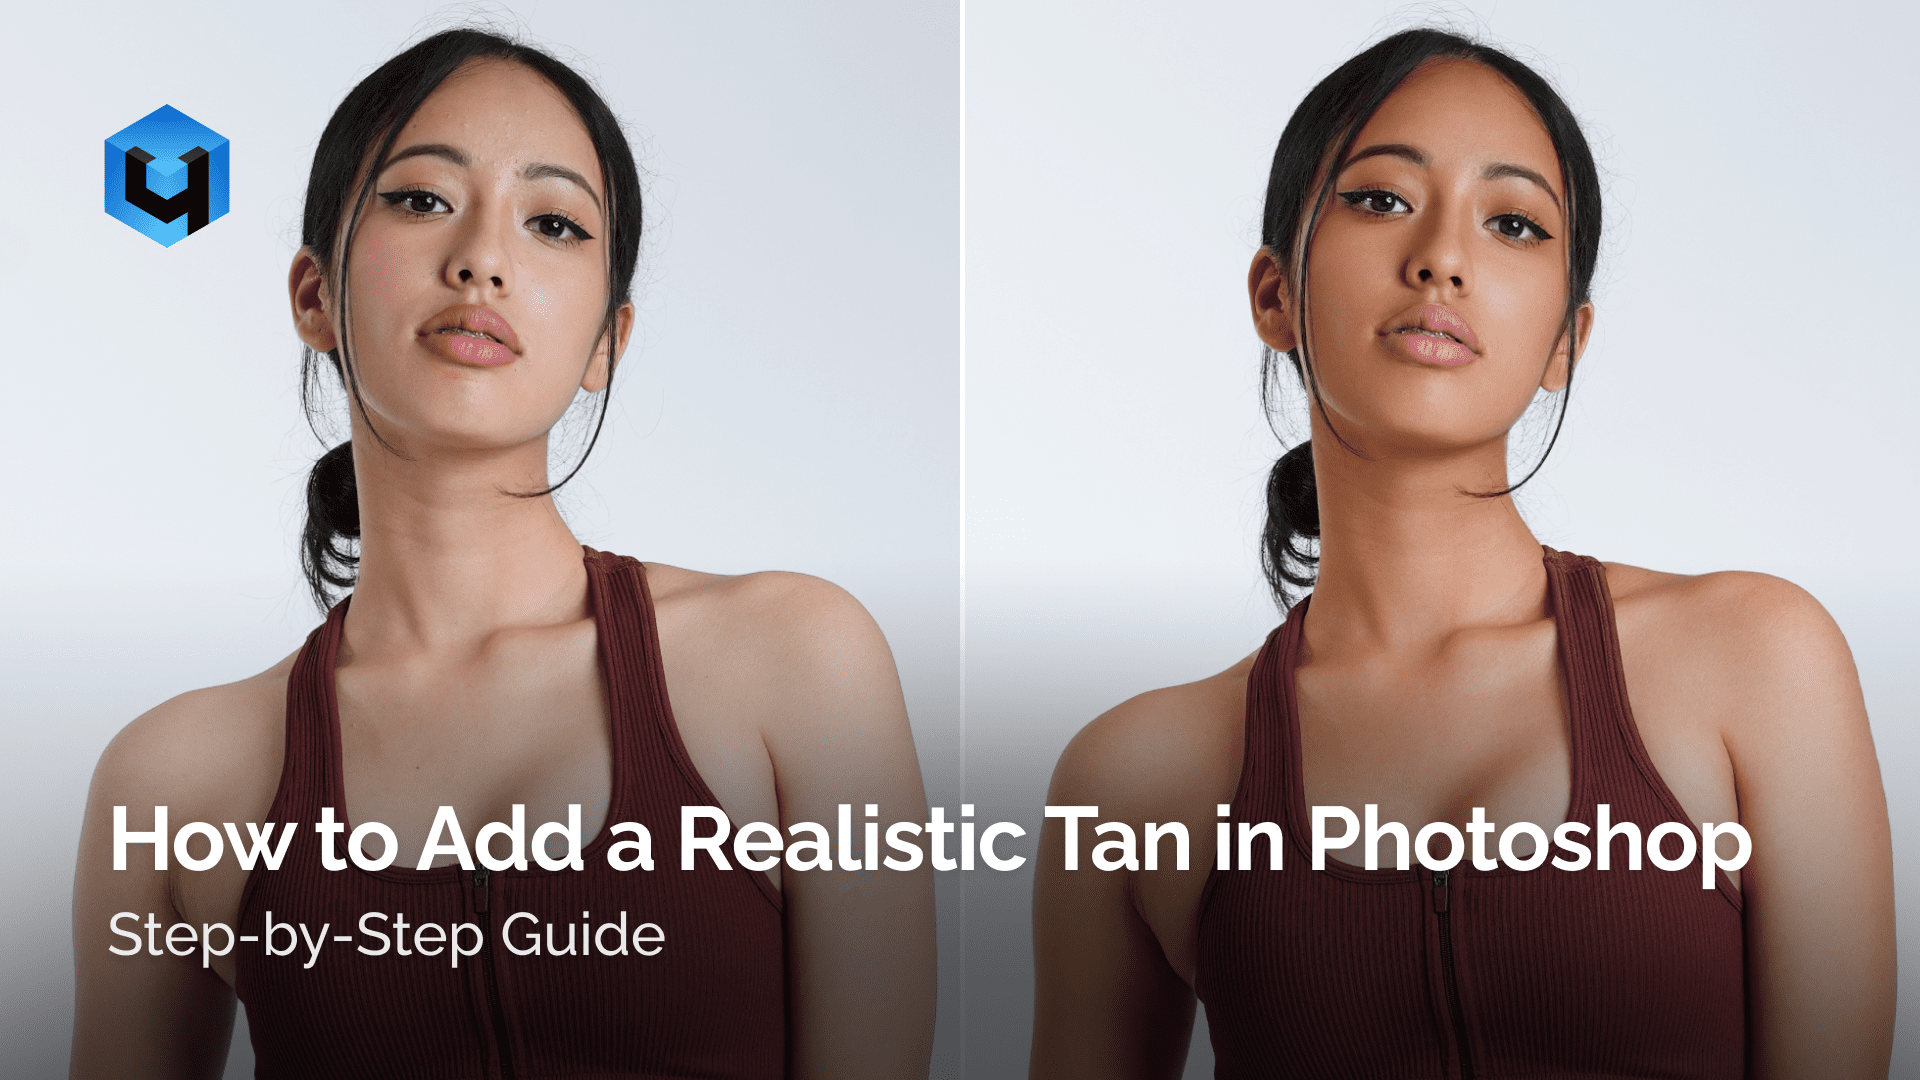
If you want to see the full workflow in action, watch the video below. It demonstrates the complete process from start to finish.
Why Skin Tan Looks Fake in Photoshop
Most common mistakes:
- adjusting the whole image instead of isolating skin
- using Hue/Saturation without control
- no accurate skin mask
- ignoring highlights and light behavior
As a result:
- skin looks dirty or oversaturated
- natural volume disappears
- the image looks like a filter instead of real tanning
The Correct Way to Add a Tan
To get a realistic result, you need a structured workflow:
- Isolate the skin from the rest of the image
- Adjust midtones for color change
- Control brightness and contrast
- Preserve highlights and shadows
- Avoid affecting clothing and background
The most important step is accurate skin masking.
How to Select Skin in Photoshop
There are several ways to select skin.
Color Range
A classic method using skin tones.
Problems:
- selects clothing and background
- requires manual cleanup
- not suitable for batch processing
Select Subject (AI in Photoshop)
Modern AI-based selection tool.
Pros:
- automatically detects people
Cons:
- does not isolate only skin
- requires manual refinement
- inconsistent across images
Camera Raw / Lightroom Skin Mask
Skin masking is available in Adobe Camera Raw and Lightroom.
Pros:
- fast and automated
- decent results in many cases
Cons:
- cannot export mask to Photoshop layers
- limited control
- may miss or misidentify areas
AI-Based Skin Mask for Precision
For accurate and consistent results, use Retouch4me Skin Mask.
This tool solves the main problem: it creates a precise skin mask automatically without:
- selecting clothing or background
- manual cleanup
- inconsistencies across images
This is especially important for batch editing and automated workflows.
How to Add a Tan: Professional Workflow
After creating the mask:
- Create a group (for example, “Tanning”)
- Apply the skin mask to the group
- Add color adjustments inside the group
This ensures all adjustments affect only the skin.
How to Adjust Skin Color Properly
Avoid Hue/Saturation. Use Selective Color instead.
Recommended setup:
- In Reds: adjust Cyan, increase Yellow and Magenta
- In Yellows: increase Yellow
- Keep Black at minimal levels
Important:
- work mainly on midtones
- avoid introducing noise in shadows
How to Darken Skin Without Losing Volume
Real tan always slightly darkens the skin.
Use Curves:
- reduce midtones
- protect highlights
- preserve shadows
If you over-darken:
- volume disappears
- the skin looks flat
How to Fix Uneven Skin Tone
For uneven lighting, use Gradient Map.
It allows you to:
- smooth tonal inconsistencies
- control color transitions
- create a more unified tan
How to Avoid Harsh Transitions
Always:
- soften mask edges
- avoid sharp boundaries
- use feathering or smoothing
This ensures a natural result.
How to Automate the Workflow
Once the layer structure is set, you can:
- record it as an action
- apply it to multiple images
- adjust opacity for fine tuning
To manage layers and speed up your workflow, use Retouch4me Photoshop Panel.
It helps you:
- quickly apply retouching workflows
- organize and control layers
- automate repetitive steps
- maintain a non-destructive workflow
Final Thoughts
To create a realistic tan in Photoshop:
- use accurate skin masking
- control color with Selective Color
- manage brightness with Curves
- preserve highlights and volume
- automate the process when possible
The most reliable setup combines:
If you want to see the full process in practice, watch the video. It shows how to combine all steps into a consistent and scalable workflow.