

Alina Sky, Retoucher at Retouch4me
Summer is a wonderful time for outdoor photography. Natural light, warm weather, and beautiful locations create great opportunities for portraits, but they also bring a few challenges during post-processing.
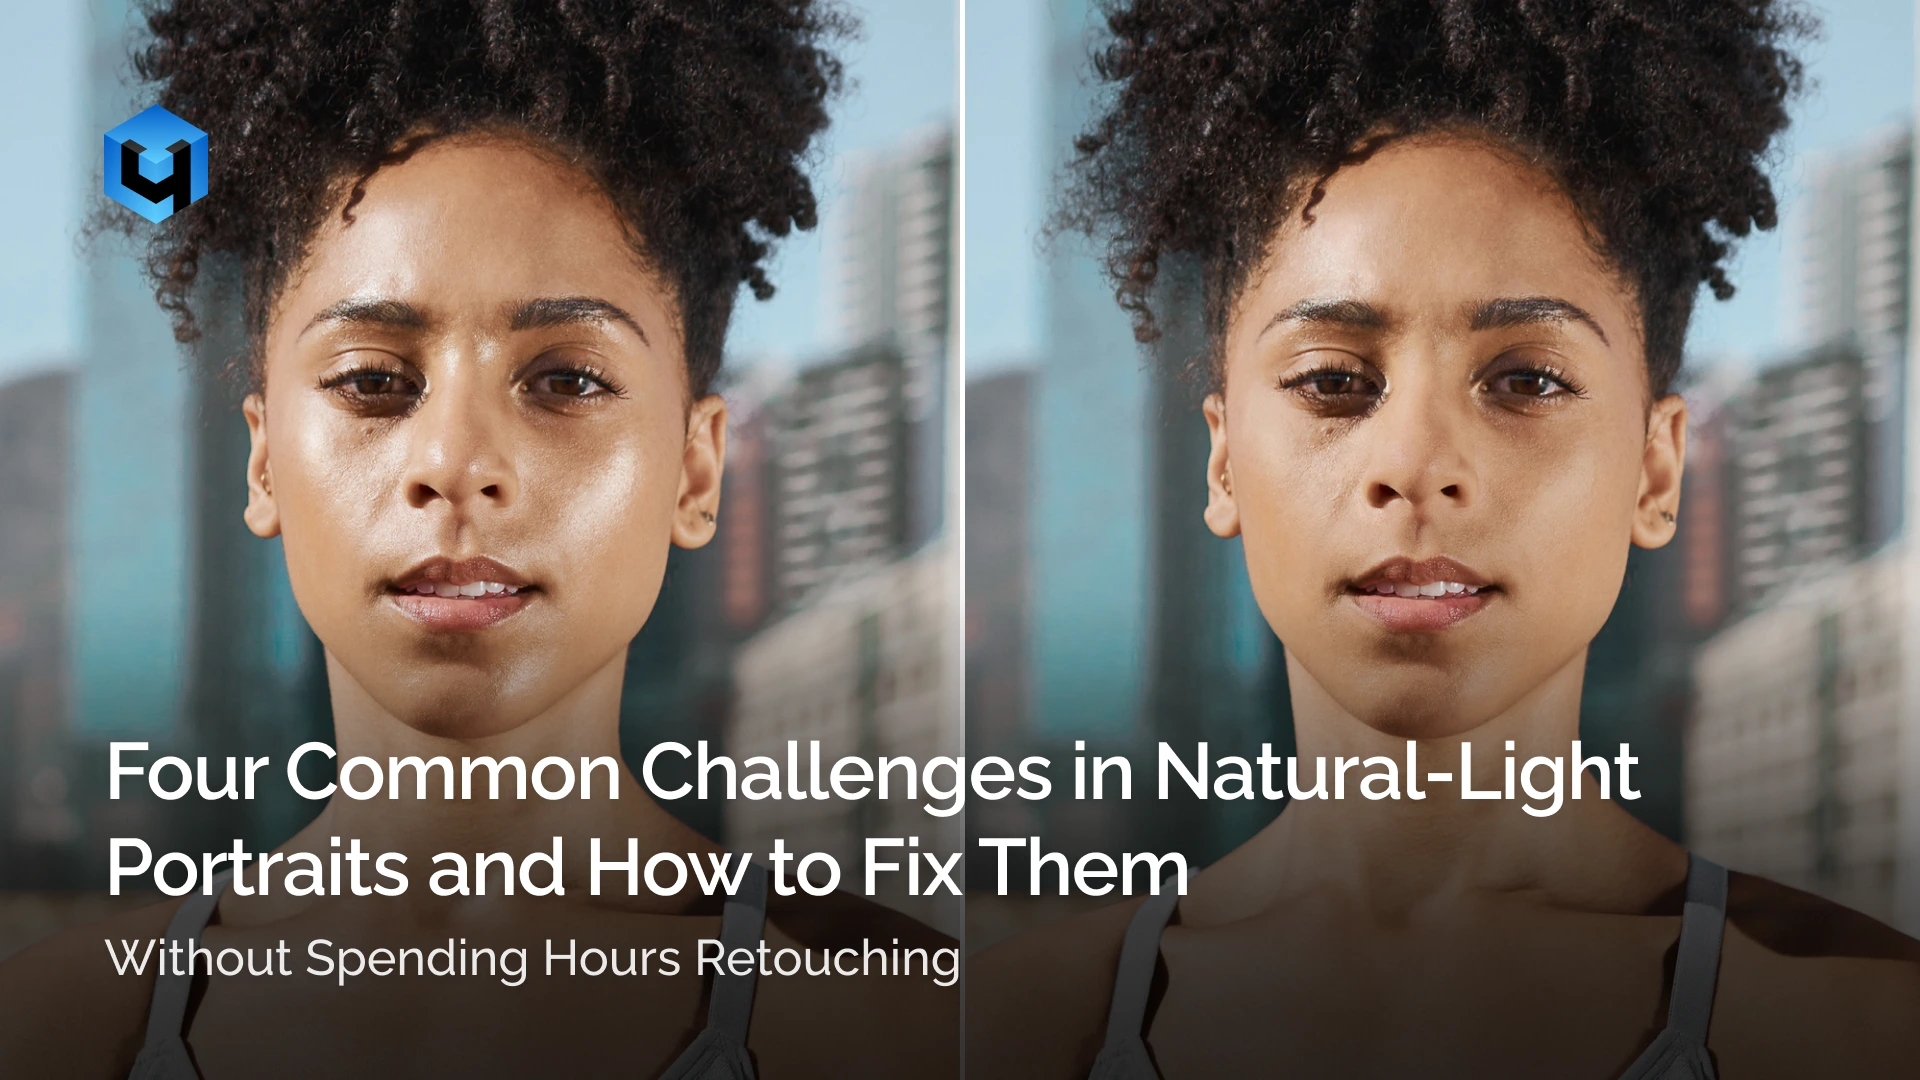
Skin can develop redness, uneven tones, and unwanted shine. Stray hairs may become more noticeable, while dust and small bits of debris can end up on clothing. Each of these details may seem insignificant on its own, but in the final image, they can distract from the subject and make the photograph look less polished.
You don’t need to fix every imperfection manually, and retouching shouldn’t turn into a process that takes hours.
Over the years of working with portraits, I’ve developed a simple principle: retouching should remove distractions while preserving the person’s natural appearance and the atmosphere of the photograph.
In this article, I’ll cover four common problems in natural-light portraits, explain how to fix them manually, and show which tasks can be efficiently delegated to AI-powered tools.
Redness and Uneven Skin Tone
Heat, sunlight, and physical activity can quickly affect the appearance of skin. Redness may develop on the cheeks and nose, exposed areas of the body can take on a grayish or bluish tint, and the overall skin tone may become uneven.
A common mistake is trying to fix everything with a regular brush or simply reducing red saturation. The first approach can easily create patchy results, while the second can strip the face of its natural color.
How to Fix It Manually in Photoshop
- Open the Info panel and use the Eyedropper tool to measure the Hue value on an area of skin with a natural tone. Then compare it with the value on the reddened area.
- Create a Hue/Saturation adjustment layer and select the Reds channel.
- Increase Hue to its maximum value and adjust the lower range sliders so that only the unwanted red areas remain selected. For example, if the natural skin tone is around 20–25°, set the right boundary of the range accordingly.
- Return Hue to its original value, then shift it toward the desired shade so that the redness blends with the surrounding skin tone.
- Use a black brush on the layer mask to remove the adjustment from the lips, clothing, and other areas that don’t need correction.
- Even out any remaining brightness variations using Dodge & Burn.
What to Keep in Mind
There is no single “correct” skin tone that works for every photograph. Values depend on the lighting, white balance, camera, color profile, and the person’s natural complexion. Use the numbers as a reference, and make your final decisions based on the entire image.
You should also avoid removing natural blush completely. If you make the skin perfectly uniform, the face will lose dimension and start to look artificial.
How to Speed Up the Process
If you’re working with a series of photographs, Retouch4me tools can significantly speed up this type of correction.
- Use Skin Tone to even out skin color.
- Use Dodge & Burn to correct remaining brightness variations and small blemishes.
- Add Skin Mask to restrict the effect of the tools to skin areas.
- To run these tools quickly, use Retouch4me Panel for Photoshop or Retouch4me Arams.
Tip: If Dodge & Burn produces overly broad corrections and affects large areas of skin, select Full Body instead of Close-up in the settings. Full Body applies corrections more precisely and works well for small imperfections in full-body portraits.


The purpose of automation is to prepare a clean starting point for your work quickly, leaving the creative decisions in your hands.
How to Reduce Oily Shine: Selective Color, Darken, and Mattifier
When shooting in hot weather, unwanted shine most often appears on the forehead, nose, cheeks, and chin. These areas can look much brighter in photographs than they do in real life, especially under directional lighting or when the skin is close to an overexposed area.
Simply darkening a bright spot isn’t enough. A good correction should:
- Restore a natural skin tone to the highlight.
- Preserve facial dimension.
- Retain some natural highlights.
- Avoid making the skin look flat and plastic.
Method 1: Selective Color
Create a Selective Color adjustment layer and select Whites. Gradually add black to reduce the brightness of the highlight. If necessary, adjust the red and yellow components to bring the highlight color closer to the surrounding skin.
Next, invert the layer mask and reveal the correction only in the problem areas.
This method works well when highlights differ from the surrounding skin in both brightness and color. The key is to avoid removing the light completely. Subtle highlights help preserve the natural dimension of the face.
Method 2: Darken Blending Mode
Create a blank layer and set its blending mode to Darken. Choose a soft brush, hold Alt to sample a color from the area next to the highlight, and carefully paint over the problem area.
Sample colors regularly as you move along the contours of the face. Using a single shade across the entire area will quickly make the skin look flat.
After the main correction:
- Apply a slight blur to the layer.
- Reduce its opacity.
- Make sure the transitions between light and shadow remain intact.
At an intermediate stage, the skin may look too smooth. That’s normal. Reducing opacity and applying a subtle blur will help the correction blend naturally.
When to Use Automation
If shine appears in just a few photographs, manual retouching is usually sufficient. When you’re dealing with dozens or hundreds of images, a specialized tool such as Mattifier can save considerable time.


It reduces the most noticeable highlights, after which I manually adjust the intensity and check the more challenging areas. The nose, cheekbones, and forehead deserve particular attention. Removing all highlights from these areas can make the face lose its natural dimension.
Stray Hairs: How to Clean Up Hair Edges with Photoshop and Stray Hairs
It’s almost impossible to keep a hairstyle perfectly in place during an outdoor shoot. Even a light breeze can send individual strands across the face, disrupt the hair outline, and create visual clutter around the head.
Removing every strand with the Healing Brush or Clone Stamp is possible, but with complex hairstyles, this quickly becomes a long and repetitive task.
First, Decide Which Hairs to Remove
Not every stray hair needs to go. A perfectly smooth hairline rarely looks natural. Before retouching, I divide stray hairs into three categories:
- Hairs crossing the eyes, lips, or other important facial features.
- Hairs that noticeably disrupt the overall hairstyle.
- Small, natural flyaways that can be left untouched.
Removing everything indiscriminately can make the hairstyle look cut out and pasted onto the background.
A Quick Manual Method
Instead of removing each strand individually, you can clean up most of the hair outline in one go:
- Duplicate the original layer.
- Select the main mass of hair.
- Refine the selection edge, separating the main hair shape from individual flyaways.
- Move the selected area onto a separate layer.
- On the layer below, restore the background using Content-Aware Fill.
- Make all layers visible again.
- Remove any remaining stray hairs with the Healing Brush or Clone Stamp.
This method is particularly useful when the hair is against a relatively uniform background. On complex backgrounds with architecture, branches, or contrasting details, Content-Aware Fill may produce inaccurate results.
Once the outline is clean, you can manually add back a few fine strands. Use a small, hard brush and, if you’re working with a graphics tablet, enable pen pressure sensitivity. This will help create naturally tapered hair tips.
How to Speed Up an Entire Series
The specialized Stray Hairs tool can automatically detect and remove a significant number of flyaways while preserving the overall hairstyle outline. Even so, I avoid using maximum intensity.
The ideal result is one where viewers no longer notice distracting stray hairs, while the hairstyle still looks natural and full of life. After automated processing, check the hairline, ears, shoulders, and areas where hair overlaps with clothing.
Dust, Grass, and Debris: Dust & Scratches and Retouch4me Dust
Grass blades on clothing, dust on shoes, small stones on the road, and spots in the background are easy to overlook during a shoot. They’re barely noticeable on a camera screen, but become distracting when viewed on a large monitor.
If there are only a few imperfections, the regular Healing Brush is usually the easiest solution. However, when you’re dealing with numerous small defects, faster methods are worth considering.
The Dust & Scratches Filter
Create a duplicate layer and go to:
Filter → Noise → Dust & Scratches
Adjust the Radius until the small imperfections disappear. Then use Threshold to bring back some texture and preserve the edges of details.
Next:
- Add a black layer mask.
- Use a soft white brush to reveal the effect only on the affected areas.
- Avoid applying the filter to the entire image.
- Check the texture at 100% zoom.
This method works well when imperfections are:
- Small.
- Different from the surrounding surface in brightness or color.
- Located on smooth or minimally textured backgrounds.
- Not touching complex, high-contrast edges.
When This Method Doesn’t Work
On grass, gravel, textured fabrics, and other complex surfaces, the filter can destroy details and create an unwanted painterly effect. In these situations, manual retouching or a tool capable of detecting individual particles and removing them without blurring the surrounding surface is a better choice.
The same principle applies to automated cleanup: remove the majority of imperfections first, then inspect the result manually. Pay particular attention to small clothing details, jewelry, shoe edges, and road textures.
What Should You Automate?
I don’t see manual and automated retouching as two opposing approaches. For me, they’re simply parts of the same workflow.
Manual editing provides precision and control, but not every action requires a creative decision. There’s little reason to repeat the same technical operation dozens of times when it can be automated reliably.
I typically delegate the following tasks to AI-powered tools:
- Initial skin tone correction.
- Basic Dodge & Burn.
- Reducing oily shine.
- Cleaning up hair edges.
- Detecting dust and small debris.
I keep the following decisions in my hands:
- Choosing the level of retouching.
- Checking whether the result looks natural.
- Preserving the person’s expression and character.
- Defining the color mood of the photograph.
- Fine-tuning challenging areas.
- Making the final decision about when to stop retouching.
My Retouching Workflow
For a natural-light portrait series, I recommend following this workflow:
- Select the strongest images, both technically and emotionally.
- Apply basic color correction across the entire series.
- Check skin tones and correct noticeable color patches.
- Reduce unwanted shine while preserving natural facial dimension.
- Clean up stray hairs without making the hairline perfectly smooth.
- Remove dust and other distracting details.
- Compare the result with the original.
- Reduce the effect wherever the retouching has become more noticeable than the portrait itself.
The last step is particularly important. When you spend a long time working on an image, your eyes gradually adjust to the changes, making it easy to go too far. Comparing the retouched version with the original helps restore natural texture, dimension, and character.
The Main Principle
AI-powered tools don’t replace the creative side of photography. They help you complete repetitive tasks faster and reduce editing time.
Good retouching shouldn’t draw attention to how much work went into an image. Its purpose is to remove anything that unintentionally distracts from the photograph while preserving everything that made the shot worth taking: the person, the light, the mood, and the story.
Delegate the routine. Keep the final decisions in the photographer’s hands.
Which Tools Do You Need?
All the manual techniques described in this article are demonstrated in Adobe Photoshop. You’ll need the following standard tools and features:
- Hue/Saturation — for evening out skin tones.
- Dodge & Burn — for correcting brightness variations and uneven patches.
- Selective Color and the Darken blending mode — for reducing oily shine.
- Healing Brush, Clone Stamp, and Content-Aware Fill — for cleaning up stray hairs.
- Dust & Scratches — for removing fine dust and small imperfections.
To speed up your workflow, you can use Retouch4me plugins directly in Photoshop:
- Skin Tone — evens out skin tones.
- Dodge & Burn — corrects localized bright and dark areas.
- Mattifier — reduces oily shine.
- Stray Hairs — removes flyaway hairs.
- Dust — removes dust and small debris.
Note: You can run multiple plugins sequentially using Retouch4me Panel for Photoshop. If you need to process an entire series without manually opening each image in Photoshop, you can build the same workflow in Arams.