

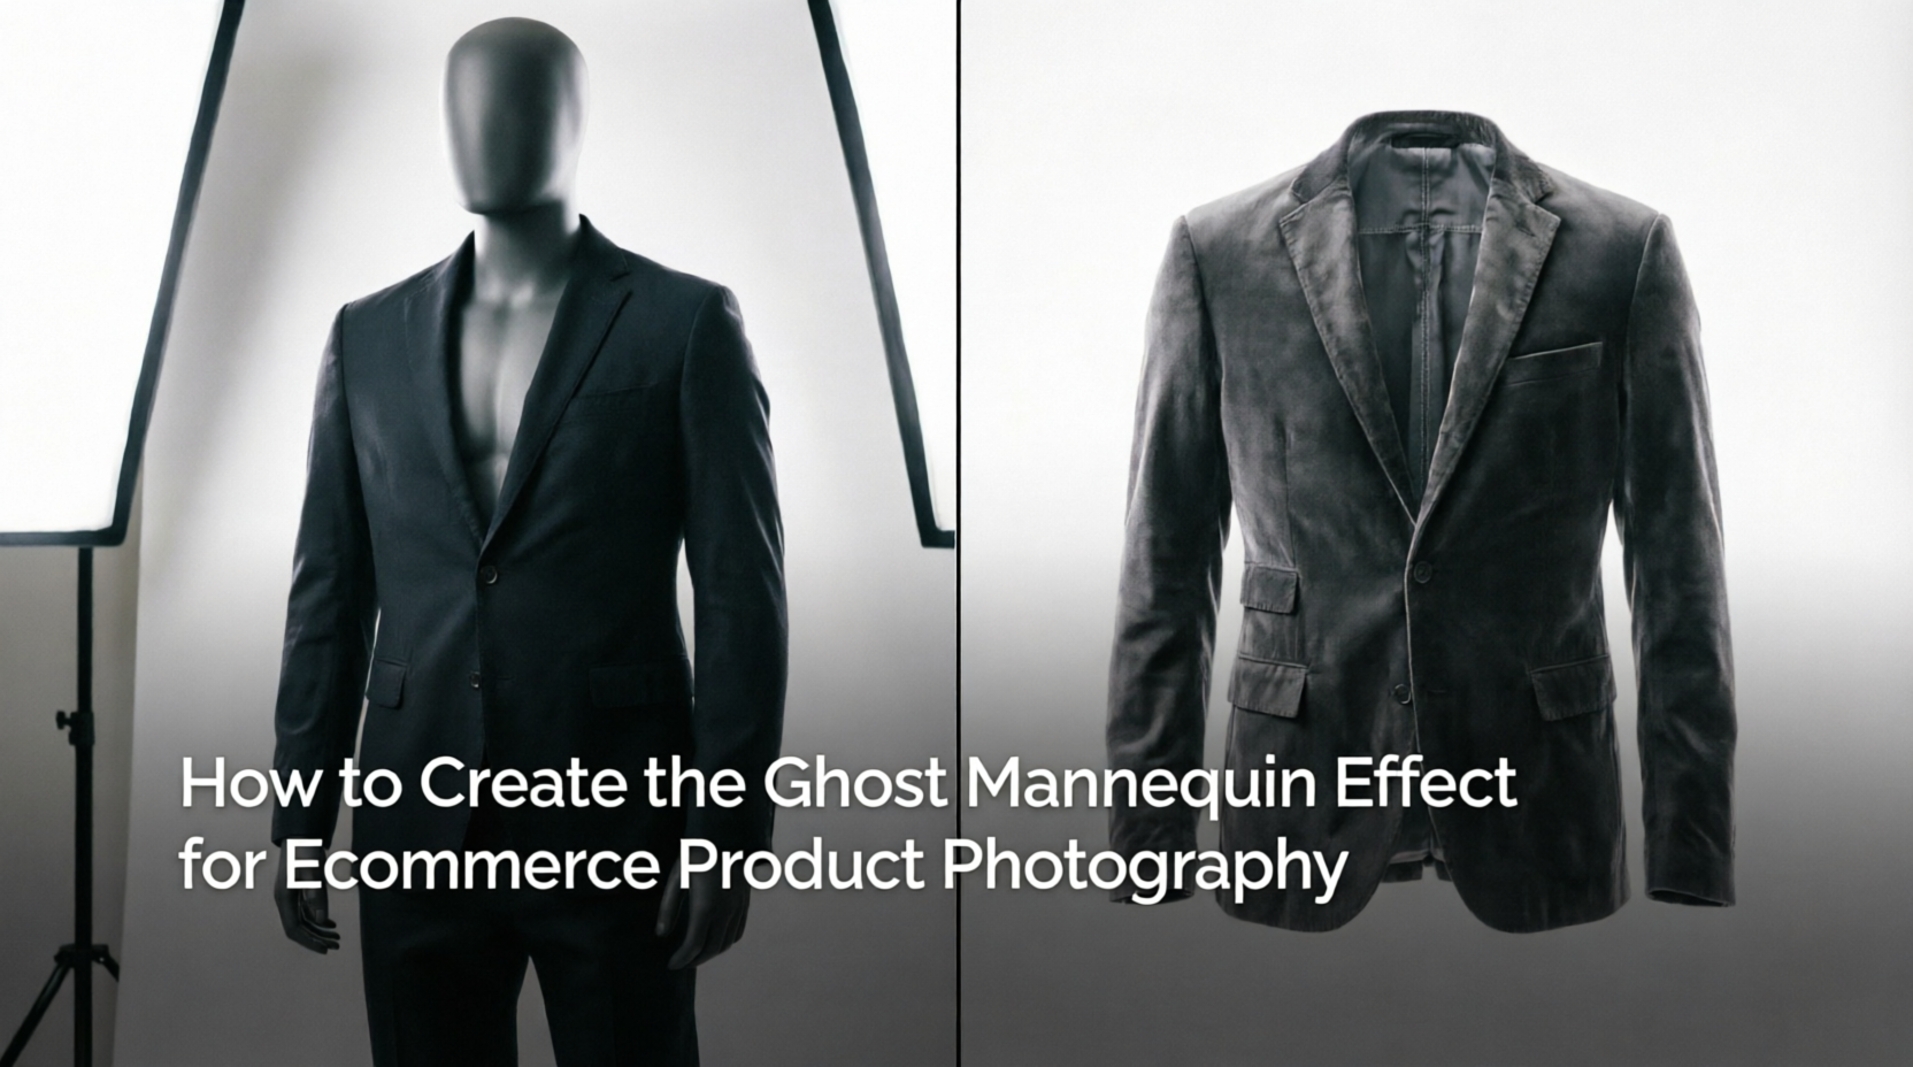
Every apparel photographer working at catalog scale runs into the same wall eventually. Model shoots produce great images but don’t survive contact with a 300-SKU season. Flat lays are fast and cheap but flatten structure and kill the sense of fit. Ghost mannequin photography exists precisely in that gap. It gives structured garments the 3D shape that only a body can provide, without the model on set and without the budget that goes with one. This guide covers the complete workflow: studio setup, the Photoshop composite, and the batch production structure that makes it practical across hundreds of SKUs rather than just a handful.
Table of Contents
What Is the Ghost Mannequin Effect?
Ghost Mannequin vs Flat Lay vs Model Photography
Studio Setup for Ghost Mannequin Photography
Step-by-Step Ghost Mannequin Photoshop Workflow
Scaling Ghost Mannequin Editing for a 100+ SKU Catalog
Common Ghost Mannequin Mistakes and How to Fix Them
Manual vs Outsourced vs AI-Assisted: Which Workflow Fits Your Studio?
What Is the Ghost Mannequin Effect?
The name describes the result more than the process. A garment is dressed on a mannequin for the shoot, the mannequin is removed afterward in editing. What remains looks like clothing held up by nothing at all. No visible support, no model, no hanger. Just the garment reading in three dimensions the way it would on a body.
Photographers and retouchers use several terms interchangeably for this. Invisible mannequin photography. Hollow man photography. Ghost mannequin effect. The vocabulary shifts from one market to the next and from one retouching community to another, but the Photoshop process is the same regardless of what anyone calls it.
What drove the technique into standard practice is a gap that every online clothing retailer eventually has to close. A shopper browsing apparel online gets no tactile information at all. Fit, drape, weight, structure — none of it comes through a flat image. A live model solves that problem in theory, but model photography brings real costs in practice: scheduling, styling, the difficulty of maintaining visual consistency across hundreds of SKUs shot over multiple days or weeks. Ghost mannequin photography closes the gap differently. It preserves the structural read of on-model photography without the production overhead, and the shooting and editing process stays consistent enough to repeat across a full season catalog without visual drift.
Platform image requirements shaped how broadly the technique got adopted. Amazon product photo requirements set a precise baseline: pure white background at RGB 255, 255, 255, product filling at least 85 percent of the frame, nothing else in the shot. ASOS follows similar logic across its catalog without publishing the same kind of numeric spec. Shopify puts no formal image requirements on merchants at all, but apparel sellers on the platform generally default to Amazon-style standards because shoppers have come to expect that level of visual consistency. Ghost mannequin photography satisfies all of these technical baselines by default.
One category-specific rule is worth flagging separately. Amazon’s Women’s and Men’s clothing categories require the primary listing image to show a human model, not a mannequin. A ghost mannequin shot clears every technical requirement — white background, correct framing, no visible support — but for those two categories specifically, it slots into the secondary image gallery rather than the primary listing position.
Catalogs running 50 to 500 SKUs per week built ghost mannequin photography into their standard workflow because both sides of the process scale. The shooting side repeats the same setup from garment to garment. Ghost mannequin photo editing follows the same compositing sequence every time. That consistency is what makes the output suitable for a 500-piece season rather than just a single hero product.
Ghost Mannequin vs Flat Lay vs Model Photography
Three formats dominate apparel product photography in eCommerce: ghost mannequin, flat lay, and on-model. Each one produces a fundamentally different result, draws on different equipment, and fits a different point in the production budget. Picking the wrong format for a given product type doesn’t just affect how the image looks. It adds editing work, slows the catalog down, and creates visual inconsistencies across marketplace listings.
Knowing where each format works best lets studios make that call quickly at the planning stage, rather than discovering the mismatch after shooting is done. The table below lays out the practical differences across the parameters that matter most to photographers and brands running large clothing catalogs.
| Ghost Mannequin | Flat Lay | Model Photography | |
|---|---|---|---|
| Garment shape | 3D structure visible | Flat, no body shape | Shown on a real body |
| Typical production cost | Moderate | Low | High |
| Equipment needed | Mannequin, lights, Photoshop | Flat surface, lights | Model, photographer, lighting, styling |
| Catalog consistency | High | High | Moderate |
| Production speed | Moderate–Fast | Fast | Slow |
| Marketplace compliance | Meets most marketplace image standards | Meets standards | Requires cropping adjustments |
| Best for | Structured apparel, most SKUs, your entire catalog | Accessories, small items | Hero products, lookbooks |
No single format covers every product in a catalog well. Ghost mannequin photography handles the bulk of structured apparel: jackets, shirts, dresses, trousers, anything that holds its shape on a form. Flat lay suits accessories, scarves, and smaller items where body shape has no bearing on the buying decision. On-model shots get reserved for hero products and campaign imagery, where storytelling, branding, and lifestyle presentation matter more than production efficiency.
A simple planning rule covers most decisions. If the garment has structure worth showing, ghost mannequin is the default. If the item lies flat by nature, flat lay is faster and cheaper. If the product is launching with a full campaign behind it, on-model is the right investment. Studios running 360 product photography alongside standard catalogs typically use ghost mannequin as the consistent base layer across the full SKU range.
Studio Setup for Ghost Mannequin Photography
A complete ghost mannequin studio setup requires three things: the right mannequin type, consistent lighting, and a full set of front, back, and interior shots for each garment. Getting these right before shooting reduces the amount of corrective editing needed later in Photoshop.

Choosing the Right Mannequin
Standard retail display mannequins create more editing work than they save. Fixed necks, rigid shoulders, and solid joints are difficult to remove cleanly during ghost mannequin photo editing, and the extra masking they require slows down the workflow considerably. For eCommerce apparel, most photographers work with specialized invisible mannequins built around removable sections.
Which type fits depends on the garment:
- Full-body invisible mannequin: suits, dresses, jumpsuits, and other full-length apparel
- Half-body mannequin (torso): shirts, jackets, tops, and outerwear
- Neck form: knitwear, T-shirts, sweaters, and collarless garments
- Trouser or skirt form: trousers, shorts, skirts, and other lower-body apparel
Removable components are worth prioritizing. When the neck, chest, or waistband section lifts out cleanly, the photographer can shoot the garment interior without changing the overall setup or risking the garment shifting position. This directly simplifies the neck join Photoshop process and cuts mannequin product editing time across the full catalog.
Lighting and Camera Settings
Uneven lighting is one of the harder problems to fix in post-production, because exposure and color temperature differences between shots become visible at the composite seams. Two softboxes at roughly 45 degrees on either side of the garment produce the soft, even spread that apparel photo editing needs. A reflector or a third fill light placed behind the subject takes care of shadows falling on the backdrop.
Recommended camera settings for studio apparel photography:
- Aperture: f/8 to f/11 for maximum garment sharpness
- ISO: 100 whenever possible to minimize image noise
- Shutter speed: 1/125 to 1/200 sec, depending on flash sync speed
- White balance: set manually with a gray card before shooting
Shooting tethered to a calibrated monitor catches lighting inconsistencies, garment wrinkles, and framing issues while there’s still time to fix them on set rather than in editing.
What Shots to Capture
Creating the ghost mannequin effect requires at least two photographs per garment, sometimes three. A missing shot almost always means either a reshoot or extra reconstruction work in Photoshop, both of which cost more time than capturing the full set correctly on the day.
For each SKU, the required captures are:
- Front view: garment on the mannequin, photographed straight-on
- Back view: identical setup with the garment rotated 180 degrees
- Inside neck or waistband view: mannequin section removed to reveal the garment interior
- Detail shots: stitching, fabric texture, labels, zippers, buttons, or other product features (optional but useful for eCommerce product pages)
Running the same checklist for every SKU keeps the catalog uniform and reduces per-image editing time. Consistency at the shooting stage is what makes ghost mannequin photography practical to scale across large eCommerce collections.
Step-by-Step Ghost Mannequin Photoshop Workflow
The ghost mannequin Photoshop workflow takes two or more source images, typically the front view and either the back or the garment interior, and combines them into a single composite that reads as a hollow, floating garment. AI tools handle a lot of the surrounding cleanup efficiently, but the composite itself stays manual. Aligning the garment correctly and building a convincing neck join both require direct human judgment. The real time savings come from automating what surrounds the composite, not from trying to replace it.
Cut Out the Front View
Knowing how to remove the mannequin from a photo starts with a clean isolation of the garment in the front image. Select and Mask or the Pen Tool both work for building an accurate selection around the garment edges. The areas where fabric meets mannequin, collar, cuffs, and hem, need the closest attention because any roughness here carries through to the finished composite.
Keep the garment on a separate layer with a layer mask rather than deleting pixels outright. Non-destructive editing makes it straightforward to refine edges or adjust the mask later without starting the cutout from scratch.
Composite the Neck and Inside

This step decides whether the final ghost mannequin image reads as professional or unconvincing. The inside view, captured with the mannequin’s neck, chest, or waistband section physically removed, goes behind the front layer to recreate the hollow interior of the garment.
Position the inside layer with Free Transform until perspective and scale match the front view. Then mask it so only the visible interior, collar lining, inner seams, and similar details show through the opening. This allows you to turn photos into ghost mannequin composites that read as natural rather than assembled. This is the neck join Photoshop process, and it carries the most risk of the entire workflow. Even a small mismatch in angle, scale, or seam alignment weakens the illusion and makes the composite look assembled rather than natural.
Remove Dust and Debris
Garments pick up dust, lint, and small fibers during handling, and these particles become more visible after compositing, especially on dark fabrics or at high resolution. Manual spotting across a full catalog is slow and easy to miss.
Retouch4me Dust automatically detects and removes small particles from garments and studio surfaces, which reduces the manual cleanup load significantly when working through large batches of apparel images.
Fix Wrinkles and Creases
Minor wrinkles develop during storage, transport, and the process of dressing the mannequin. They rarely ruin a shot entirely, but they make marketplace product images look less finished than they should.
Retouch4me Fabric smooths creases while holding fabric texture, stitching, and seam definition intact. Aggressive manual smoothing often removes those details along with the wrinkle, which is why an AI-based approach tends to produce a cleaner result on apparel specifically.
Clean the Studio Backdrop
A seamless paper backdrop accumulates marks over the course of a production day. Footprints, dust, and small folds in the paper all become more visible once exposure and contrast are lifted in editing.
Retouch4me Clean Backdrop detects and removes dirt, minor folds, and sensor dust from an evenly colored studio background while leaving natural shadow transitions intact. The result looks clean without the flatness that comes from manually painting over the backdrop with a solid color.
Final Color Correction and Export
Before flattening the file, match white balance and exposure across all source layers so transitions between the front and inside views stay invisible. Keep the layered working file for future revisions and export a flattened copy for delivery.
Curves or Levels bring the background to pure white where marketplace requirements call for it.
Standard export settings by platform:
- Amazon: JPEG, sRGB, minimum 1000 px on the longest side
- Shopify: JPEG or PNG, sRGB, consistent dimensions across the catalog
- General eCommerce: sRGB color profile, pixel dimensions matched to the destination platform
Applying the same export preset across every SKU keeps marketplace listings visually consistent and removes the small differences that accumulate when files are exported case by case. Consistent product photography retouching at every stage of this workflow is what makes it the basis of best ghost mannequin retouching for eCommerce.
Scaling Ghost Mannequin Editing for a 100+ SKU Catalog

A single ghost mannequin composite takes minutes. A catalog of 200 SKUs built the same way, image by image, becomes a production bottleneck fast. Scaling this workflow is not about finding something to replace the manual compositing step. It is about removing the repetitive work that surrounds it so the photographer can stay focused on the part that actually requires judgment.
The first place a high-volume shoot loses time is culling. Before a single file reaches Photoshop, someone has to sort through hundreds of raw captures and match usable front, back, and inside views for every SKU. Retouch4me Arams handles this review step with AI-based analysis, scanning the session for focus errors, motion blur, and inconsistent framing, which gets the right files organized and ready for editing considerably faster than manual selection.
Once selections are made, batch processing takes over for the cleanup work. Retouch4me Apex applies a saved retouching preset across an entire image series in one pass. Tools like Fabric and Clean Backdrop run on every file with the same settings, no per-image configuration required. The photographer sets the preset once on a reference image, applies it to the batch, and reviews the output rather than processing each file individually.
Photoshop Actions cover the remaining repetitive steps, everything that stays identical across every SKU regardless of the garment: export format, color profile conversion, file naming, and folder structure.
A scalable ghost mannequin workflow in practice looks like this:
- Cull the full shoot in Arams to organize front, back, and inside captures for each SKU
- Build the ghost mannequin effect manually in Photoshop for every garment
- Run the composited files through Apex for dust removal, wrinkle reduction, and backdrop cleanup
- Export finished files via Photoshop Actions with consistent naming, dimensions, and color profiles
This structure keeps the composite under the photographer’s control while pushing everything around it into automation. For studios moving 50 to 500 SKUs per week, it is what makes apparel photo editing sustainable at volume rather than a bottleneck that grows with every new collection. Ghost mannequin photo editing and retouching at catalog scale becomes a throughput problem with a clear process behind it, not a manual task that scales only by adding headcount.
File organization matters as much as the editing pipeline itself. A naming convention built around SKU number, view type (front, back, inside), and version keeps large catalogs manageable and prevents mismatched files from reaching the marketplace listing upload.
Common Ghost Mannequin Mistakes and How to Fix Them
The most common ghost mannequin mistakes include an unnatural neck join, mismatched lighting between shots, visible mannequin clips, dust on dark fabric, misaligned composite layers, and choosing the wrong primary image format for a marketplace. Most of these issues trace back to inconsistent shooting conditions and can be prevented with a standardized workflow.
Unnatural Neck Join
An unnatural neck join is the fastest way to expose a ghost mannequin composite as assembled rather than real. When the inside view doesn’t match the front image in perspective, scale, or lighting, the seam shows, and no amount of masking fully hides it.
The fix starts at the shooting stage. Capture the inside view under exactly the same lighting setup as the front and back, without moving lights, adjusting exposure, or changing camera position between shots. In Photoshop, use Free Transform to align the inside layer precisely before committing to the mask.
Mismatched lighting between shots
Front, back, and inside images shot at different times or with a shifted lighting setup produce composites with visible seams where exposure or color temperature changes. The problem is usually subtle in individual frames but obvious in the finished composite.
Keeping lights, camera position, and camera settings locked across all captures for a single SKU prevents this entirely. Reviewing each set of images on a calibrated monitor before moving to the next garment catches any drift before it becomes an editing problem.
Visible Mannequin Clips or Supports
Clips used to pin fabric in place or shape a garment on the mannequin sometimes stay visible in the final image, particularly around the sides and back. Catching them in post means Clone Stamp or Healing Brush work on every affected frame.
A tethered shooting setup solves this faster. Reviewing each capture on a monitor during the session makes clips visible immediately, before the garment has moved and before the lighting setup has changed.
Dust and Lint on Dark Fabrics
Dust and loose fibers are easy to overlook on lighter garments and nearly impossible to miss on black, navy, or other dark fabrics once the image is at full resolution. Manual spotting across a full catalog of dark apparel is slow and inconsistent.
Retouch4me Dust automatically detects and removes small particles that manual retouching tends to miss, which keeps cleanup time predictable regardless of fabric color across large product catalogs.
Misaligned Composite Layers
A slight difference in rotation, scale, or position between the inside and front layers makes the garment opening look distorted at the seam. It’s one of those issues that doesn’t show up at a small preview size but becomes obvious at 100 percent.
Before flattening, zoom to 100 percent around the neck join or waistband area and check that all edges and seams align naturally. This takes less than a minute per image and catches most alignment issues before they reach the final export.
Choosing the Wrong Primary Product Image
Marketplace requirements vary by category, and ghost mannequin images don’t always belong in the primary listing slot. Some categories and platforms require the main image to feature a human model rather than a ghost mannequin photo.
Checking the image guidelines for each target marketplace before building the catalog structure prevents this from becoming a compliance issue after upload. Ghost mannequin images remain valuable across the secondary gallery regardless of what the primary slot requires.
Applying a consistent shooting and editing checklist to every SKU prevents most of these issues before they reach ghost mannequin photo editing, reduces corrective retouching later in the workflow, and keeps output quality stable across the full catalog.
Manual vs Outsourced vs AI-Assisted: Which Workflow Fits Your Studio?
The best workflow for ghost mannequin images depends on catalog size, production schedule, available budget, and how much quality control needs to stay in-house. No single approach fits every studio, and most operations land somewhere between the three options rather than committing to one exclusively.
| Manual In-House | Outsourced | AI-Assisted | |
|---|---|---|---|
| Typical editing time | Highest | Depends on provider turnaround | Lower than fully manual editing |
| Cost structure | Internal labor | Per-image or project pricing | Software or subscription cost |
| Quality control | Full control | Review after delivery | Full control over the composite |
| Turnaround | Depends on team capacity | Depends on provider | Same-day processing is often possible |
| Scalability | Limited by available staff | High | High |
| Best suited for | Small catalogs, premium brands, custom retouching | Businesses without in-house retouchers or temporary production peaks | Studios processing medium to large apparel catalogs |
Manual in-house editing gives the photographer complete control over every decision in the workflow. For smaller catalogs or brands with a specific visual style that needs hands-on attention at every stage, this is often the right call. The trade-off is that it doesn’t scale easily. As catalog volume grows, editing time grows with it at the same rate.
Outsourcing shifts the production load off the in-house team. It works well for studios without a dedicated clothing retouching service or in-house retoucher, or for handling a temporary spike in volume that exceeds current capacity. The practical trade-off is a recurring per-image cost that increases directly with catalog size, and a review step that sits between the work being done and the photographer seeing the result.
An AI-assisted approach keeps the manual compositing stage, particularly the neck join Photoshop process and garment alignment, under the photographer’s control while handling repetitive cleanup tasks automatically. Dust removal, wrinkle reduction, and backdrop correction run in batch rather than frame by frame. This cuts editing time without changing how the composite itself gets built. Some AI-based ghost mannequin tools and mannequin generators can produce results in seconds from a single flat-lay image, though output quality varies by garment type and typically needs manual refinement before it meets marketplace product photo standards.
For studios regularly producing large apparel catalogs, combining manual compositing with AI-assisted ghost mannequin photo editing and retouching tends to give the most workable balance of speed, consistency, and control. It makes apparel photo editing scale without adding headcount, and it keeps the final ghost mannequin effect exactly where the photographer wants it, with no dependency on an external marketplace product photo service.
Key Takeaways
- Ghost mannequin, invisible mannequin, and hollow man photography are three names for the same technique. The workflow is identical regardless of which term gets used: shoot the garment on a mannequin, remove the mannequin in editing, end up with a 3D floating garment shape.
- The composite is a manual step and stays that way. No plugin builds the neck join automatically. What AI tools like Retouch4me Dust, Fabric, and Clean Backdrop do is speed up the cleanup work that surrounds the composite, not replace the compositing itself.
- Studio setup determines how much time gets spent in Photoshop. Consistent lighting, a mannequin type matched to the garment, and a complete shot list (front, back, inside) reduce corrective editing later. Problems that start on set tend to compound in post-production.
- The neck join is where most ghost mannequin composites fail. A mismatch in perspective, scale, or lighting between the front and inside views is the single most common reason a finished image looks assembled rather than natural.
- Scaling a catalog means building automation around the manual step rather than replacing it. Culling in Arams and batch retouching through Apex remove the repetitive work while the composite itself stays under the photographer’s control.
- Format choice follows the garment, not the brand. Ghost mannequin suits structured apparel and works across your entire online store catalog. Flat lay covers accessories and items that lie flat by nature. On-model photography fits hero products and campaign imagery where lifestyle context matters.
- Marketplace requirements vary by category. A pure white background and correct framing apply broadly across most platforms, but some clothing categories require a human model in the primary listing image. Ghost mannequin images belong in the secondary gallery for those categories.
Frequently Asked Questions
Q: Is ghost mannequin the same as invisible mannequin?
A: Yes, ghost mannequin and invisible mannequin refer to the same technique. Hollow man photography is another name for it. All three describe a workflow where a garment is photographed on a mannequin, the mannequin is removed in editing, and the result is a naturally shaped, floating garment with no visible support. The name varies by region and professional context, but the ghost mannequin photo editing process behind each is identical.
Q: How long does ghost mannequin editing take per item?
A: It depends on the garment, the number of joins required, and the editing setup. Working manually, an experienced retoucher typically handles a standard ghost mannequin composite in somewhere around 15 to 30 minutes per item. Adding AI-assisted cleanup for dust, wrinkles, and backdrop shortens the overall time spent per image because those steps run in batch rather than requiring individual attention on every frame.
Q: Do I need a special mannequin for this technique?
A: A standard retail mannequin can work, but it creates more editing complexity than a purpose-built invisible mannequin with removable sections. When the neck, chest, or waistband section lifts out, the photographer captures the garment interior without resetting the studio or risking garment movement between shots. This simplifies the neck join Photoshop process and keeps the two source images consistent enough to composite cleanly.
Q: Can I create the ghost mannequin effect without Photoshop?
A: The traditional approach runs entirely on Photoshop layer masks and Free Transform to build the composite manually, and it gives the most control over garment shape, alignment, and the neck join. AI-powered tools can generate a similar result from a flat lay or mannequin photo in some cases, though output quality varies by garment type and typically still needs some manual refinement afterward. For professional eCommerce clothing photography where consistency across hundreds of SKUs matters, Photoshop remains the standard.
Q: Does ghost mannequin photography work for every type of clothing?
A: Structured garments hold up best. Jackets, shirts, dresses, coats, and trousers keep their shape on a mannequin form and composite cleanly as a result. Lightweight, sheer, or highly stretchable fabrics present more of a challenge. Thin materials tend to collapse or distort on the form, and the edges often need additional ghost mannequin photo editing and retouching to read as natural rather than artificially constructed.